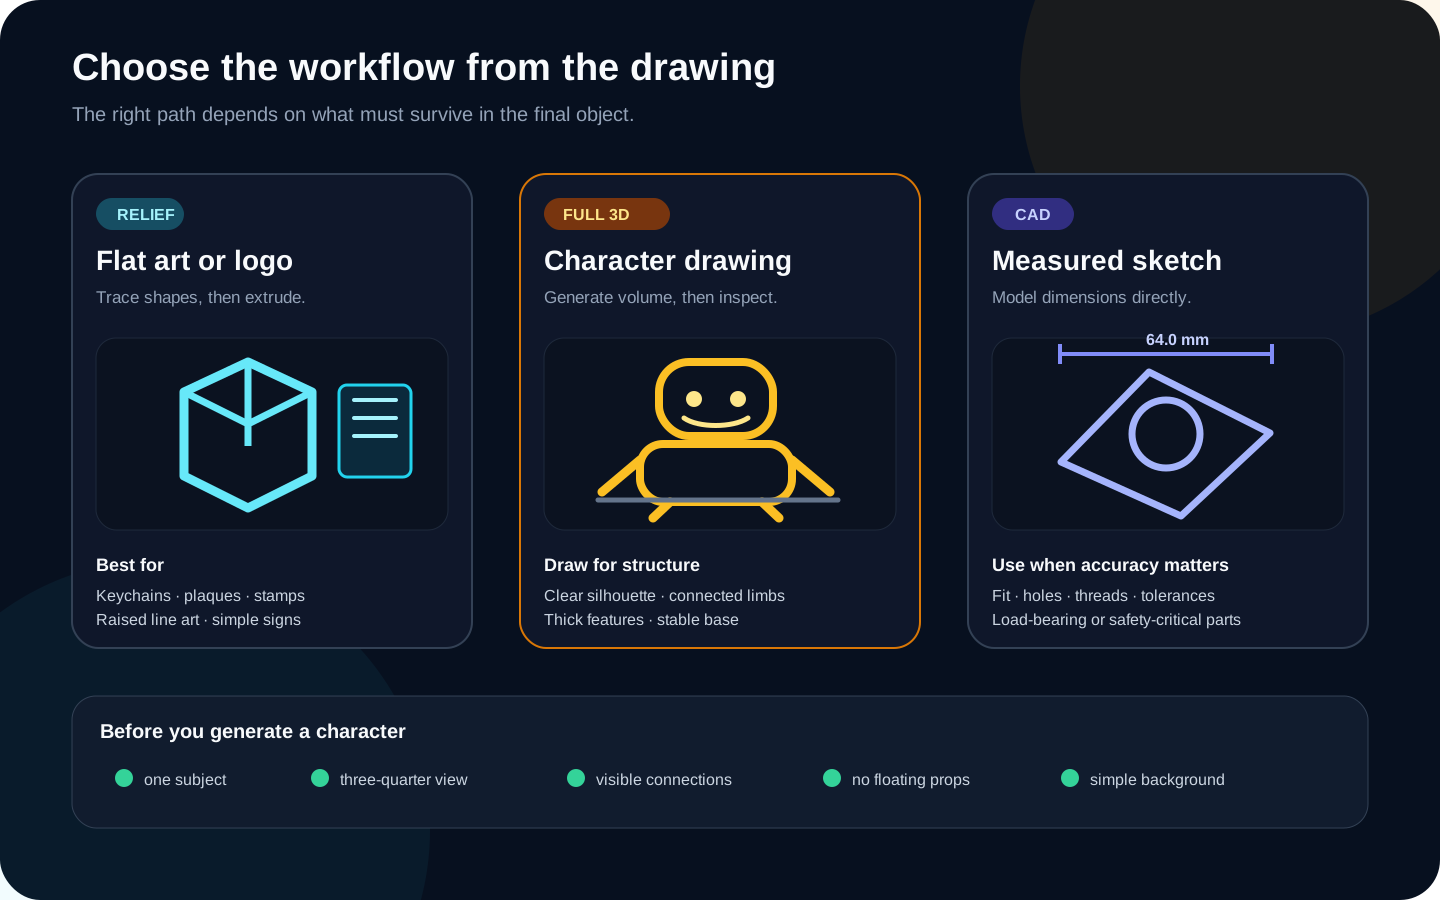
1. Choose the path before you convert anything
Trace the outline as SVG or curves, clean the shapes, and extrude them into a plaque, keychain, stamp, or raised surface.
Use image-to-3D to infer the unseen depth, then inspect the generated back, underside, pose, and connections.
Rebuild the part with exact constraints. Do not expect visual reconstruction to preserve holes, fit, threads, or tolerances.
This first decision matters more than model quality settings. A flat drawing does not contain reliable evidence about the back of an object. Full 3D generation must invent that hidden geometry. That is useful for imaginative characters, but unnecessary for a logo and unsafe for a mechanical component that must fit another part.
If the goal is a child's character, a mascot, a creature, or a figurine concept, full 3D reconstruction can produce a useful starting model. Treat it as a creative draft. If the goal is to preserve the drawing itself, a shallow relief is often faster, more faithful, and easier to print.
Three drawing-to-print examples
A handwritten name for a keychain
Keep the original strokes, trace them into clean vector paths, connect letters that would otherwise float, add an outline or backing plate, and extrude the result. This route preserves the 2D design instead of asking a generator to invent a back. Before printing, check that counters inside letters remain open and that every stroke is thick enough at the final keychain size.
A child's robot character
Use a clean photo or scan with the full robot visible. Simplify thin antennae, connect tools to the hands, and show the body from a three-quarter view. Generate a low-cost 3D draft, rotate it, and stop if the back or limbs collapse. A promising draft can be exported, given a stable base, thickened where needed, and checked in a slicer. Treat the result as a display model unless separate toy-safety requirements are satisfied.
A replacement bracket sketched with measurements
Do not use image-to-3D as the final modeling method. Measure the real part with appropriate tools, rebuild the sketch as constrained CAD geometry, define holes and thickness explicitly, and test the fit with a low-cost prototype. The drawing can explain shape and dimensions, but a visually similar generated mesh cannot prove tolerance, strength, load capacity, or compatibility with an assembly.
2. Prepare a character drawing for physical structure
Use one complete subject on a simple background. Keep the entire silhouette inside the frame and prefer a three-quarter view, because it exposes more side volume than a front-only drawing. Make the torso, head, arms, legs, and major props visually separate enough to read, but physically connected enough to become one object.
Draw thick, sturdy features. Very thin antennae, hair strands, swords, tails, fingers, or spikes can disappear at small print sizes or break after printing. Avoid floating accessories and smoky effects. If the character stands on tiny feet, add a broad base to the drawing or plan to create one during mesh cleanup.
A phone photo of a paper drawing can work, but crop out the desk, remove shadows, correct perspective, and increase separation between the drawing and background. Do not erase intentional interior lines that explain the face, armor, clothing, or joints.
3. Generate a cheap draft and inspect the unseen sides
Upload the prepared drawing to the Sketch to 3D tool and begin with Standard. The first result should answer one question: did the large shape survive? Rotate around the whole model and check the back, underside, contact between limbs and torso, base stability, and whether important props are actually attached.
Do not upgrade just because the face or texture is imperfect. A higher-quality retry makes sense only when the silhouette, pose, and hidden geometry are already promising. If the back collapses, an arm merges into the body, or a prop floats, revise the source drawing or choose a clearer angle before spending more credits.
| What you see | Decision | Why |
|---|---|---|
| Recognizable shape from every side | Continue | The draft may be worth STL export and slicer inspection. |
| Good front, broken back or underside | Change the drawing | The input did not provide enough depth evidence. |
| Detached hand, sword, tail, or hair | Simplify or repair | Floating shells become islands or fragile connections. |
| Correct body, weak small detail | Consider Pro | Extra detail is useful only after the main volume passes. |
4. Use the 3D viewer to find structural risk
Existing Image3D model
Rotate the robot before export
Inspect the sword connection, hands, ankles, feet, gaps between limbs, and the back of the body. A convincing front render is not enough.
Evidence boundary: this is a real generated GLB already held by Image3D, but its original source drawing was not retained. It demonstrates model inspection only; it is not presented as a verified drawing-to-model pair or a physical print test.
Turn texture visibility down mentally and judge the geometry. Is the sword one continuous object with the hand? Are the ankles thick enough for the intended scale? Do both feet create reliable bed contact, or will the model need a base? Are gaps between the arms and body large enough to survive slicing?
5. Export STL and slice at the intended physical size
STL export is not the finish line. Open the file in Cura, PrusaSlicer, Bambu Studio, OrcaSlicer, or the slicer for your printer. Set the final dimensions first. A finger, antenna, or sword that exists on a 200 mm model may disappear or become unprintably thin when the figure is scaled to 45 mm. Prusa's official first-print guide recommends previewing the sliced G-code and inspecting individual layers; UltiMaker likewise describes Cura Preview as the view of how the layers will be printed.
- Confirm units and final height, width, and depth.
- Choose an orientation with stable bed contact and manageable supports.
- Slice using the actual printer, nozzle or resin, and layer profile.
- Move through the layer preview from bottom to top.
- Look for mid-air starts, missing features, disconnected islands, holes, and extreme support demand.
- Repair, thicken, add a base, split the model, or regenerate before printing when the layers fail.
The AI STL slicer checklist covers this stage in more detail. For a flat logo or drawing, use the logo-to-STL relief workflow instead of forcing the artwork into a fully invented object.
6. A model based on a child's drawing is not automatically a child-safe toy
A successful render or print does not establish toy safety. Small detachable parts may be choking hazards. Sharp points can remain sharp after printing. Material choice, coatings, resin curing, mechanical strength, age suitability, and applicable local safety requirements are separate decisions. In the United States, CPSC guidance explains that children's products intended for children under three are subject to small-parts rules, while other markets have their own requirements.
Image3D does not certify generated models as toys, food-safe objects, protective equipment, or safety-critical parts. If the object will be handled by a child, remove small detachable details, avoid sharp geometry, choose materials and finishing methods appropriate to the use, and apply the relevant safety standards for your market.
Verification references
These primary sources support the slicer-inspection and toy-safety boundaries used in this guide:
- Prusa Knowledge Base: First print with PrusaSlicer — import, orient, slice, preview, and inspect individual layers.
- UltiMaker: Improving 3D printing success with Cura — Preview mode and layer inspection.
- U.S. Consumer Product Safety Commission: Small parts guidance — U.S. small-parts and choking-hazard rules for children's products.
References checked July 18, 2026. Regulations differ by country and intended use; this guide is not a compliance certification.
Frequently asked questions
Can I turn a child's drawing into a 3D print?
Yes, a clear character drawing can become a generated 3D draft. The model still needs rotation checks, STL export, slicing, and possibly repair. It is not automatically a child-safe toy.
Should flat line art become full 3D?
Usually not. Logos, handwriting, and flat art are often more faithful and printable as a traced, extruded relief.
What drawing angle works best?
A three-quarter view usually gives the generator more depth evidence than a front-only view. Keep the whole silhouette visible.
Can image-to-3D preserve exact dimensions?
No. Use CAD for dimensions, fit, holes, threads, tolerances, assemblies, and safety-critical parts.
Is the downloaded STL print-ready?
Not necessarily. Set the final size and inspect layers, supports, islands, wall thickness, orientation, and bed contact in a slicer.