The supplied evidence is a 2D concept and a physical result
Clyde is an original character created for Radio Time Machine LLC, a personalized audio-gift business in development. The customer supplied the original 2D artwork and photographs of the finished physical print, and explicitly allowed Image3D to use Clyde in this case study. We are not publishing a private account history, task ID, or the separate engineering-reference project discussed in support.

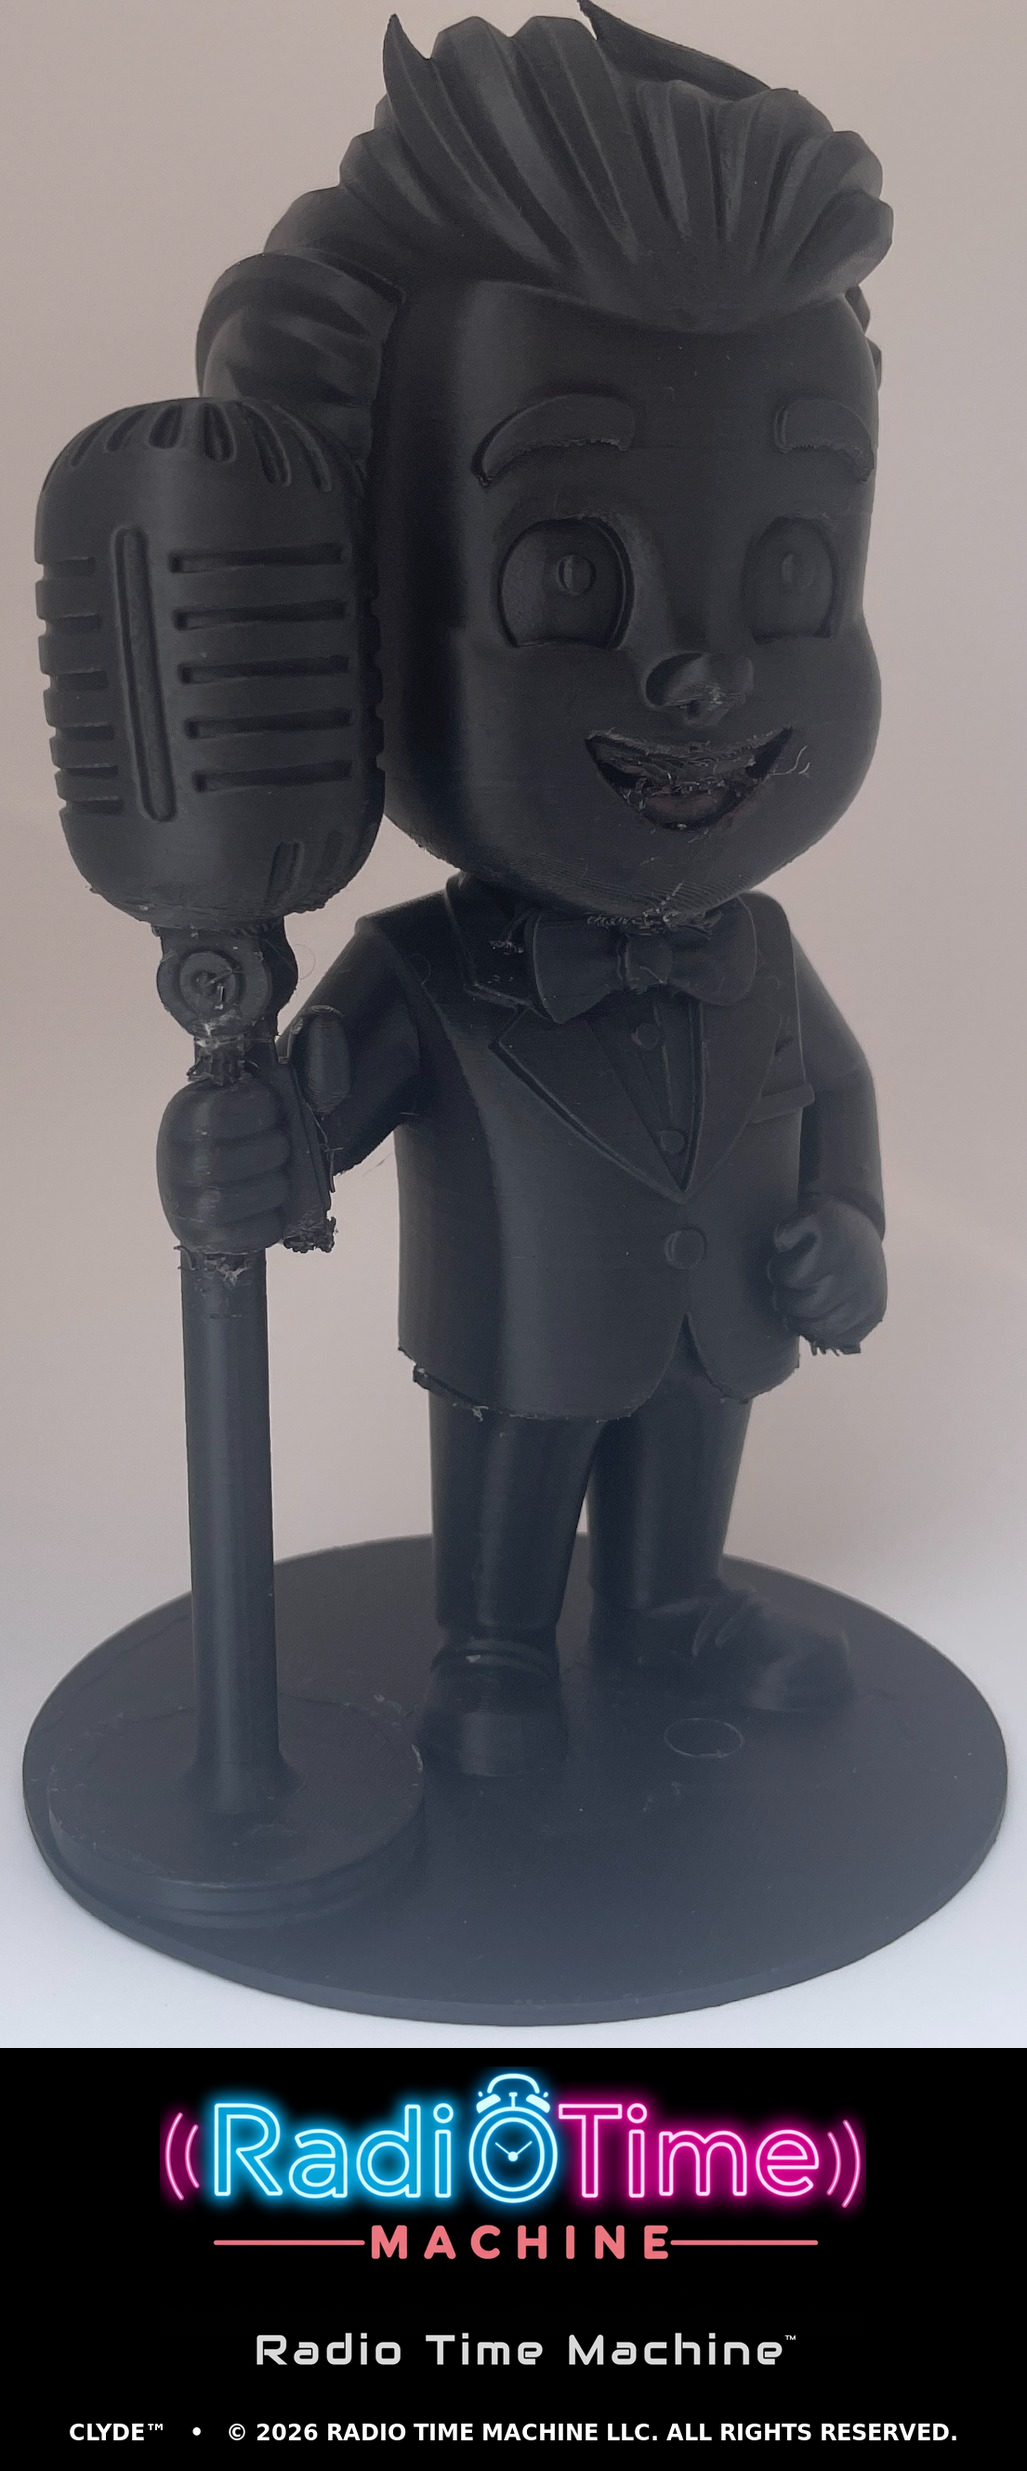
The image and printed result show why this kind of work is valuable: a character concept can become something you can hold, judge, and improve. They also show why a polished browser preview is not the final test. Features inside a mouth, narrow connections, and hidden geometry need a downstream print workflow.
What happened in the workflow
Start with the character concept
The customer used original 2D artwork of Clyde to make a first 3D draft. This is a creative reconstruction task: the generator has to infer depth and the hidden side of the character.
Keep the model only if the main shape is worth saving
The important decision is not whether a task completed. It is whether the character silhouette, pose, prominent microphone, head, and major costume features are useful enough to take into a slicer or cleanup tool.
Use the slicer as a reality check
The STL opened in Bambu Studio. The slicer found mesh holes and automatically repaired them before slicing. That repair made the print attempt possible; it did not certify every detail as safe or correct.
Plan supports and cleanup around internal details
The mouth contained teeth and other interior features. Those details needed support material and later cleanup. The customer printed the result on a Bambu Lab P1S as a display piece, then identified areas to fill or refine for a larger print.
This is the sensible success definition for an image-to-STL workflow: a recognizable output clears the first visual bar, then the slicer and physical object decide whether it is worth repairing, simplifying, rescaling, or regenerating. A customer can be happy with a display print while still having a concrete list of improvements for the next iteration. The customer report is the primary evidence for this case; the Bambu Studio project is linked only as the software reference.
What this case proves—and what it does not
| Evidence-backed in this case | Not proven by this case |
|---|---|
| An original 2D character could become a usable 3D starting model for a physical display-print workflow. | That every character image will generate a similarly usable back side, pose, or detail level. |
| The exported mesh could be opened, repaired, sliced, and physically printed in the customer's Bambu workflow. | That every Image3D STL is watertight, manifold, support-free, or physically print-ready. |
| Local repair and support planning can rescue a model whose main shape is worth keeping. | That automatic repair preserves every thin feature, internal cavity, or visual detail exactly as intended. |
| A physical print can surface useful next-step feedback for a larger or cleaner version. | That the result has engineering dimensions, tolerance, strength, toy safety, or functional-part suitability. |
How to repeat the useful part of this workflow
Use one character, mascot, pet, or stylized object with a clean silhouette. Keep the full subject in the frame, make sure important limbs and props visibly connect to the body, and avoid a busy room or multiple subjects. A three-quarter angle generally gives more depth evidence than a flat front view.
1. Generate for shape, not for a perfect print
Start with the lowest-cost generation that can answer the shape question. Rotate the preview. Look at the back, underside, base, joins between limbs and torso, and thin decorative features. If the large form is already wrong, improve the source image and regenerate instead of trying to repair every symptom.
2. Export an STL candidate and set the actual size
Small teeth, hair, fingers, microphone details, and thin ornamental features can change dramatically once you decide the physical scale. Set the intended size before judging whether a support or wall is practical.
3. Inspect the layer preview after any repair
Open the STL in the slicer you actually use. If it offers a repair, treat that as a prompt to inspect rather than a final approval. Check the repaired layers around internal voids, narrow features, the base, and every area where the first model was visually fragile. The AI STL slicer check workflow explains the general decision points.
4. Choose one next action
Regenerate when the main character concept is wrong. Repair or simplify when the main shape is good and the problem is local. Add supports, split the part, or change orientation only after the layer plan is coherent. A successful slice is a meaningful checkpoint, but only a completed physical print is physical-print evidence.
Use AI geometry as a creative reference, not as exact CAD
The same customer also described a separate task involving difficult-to-measure kayak geometry. That is a different job. An AI-generated mesh can help someone see a rough surface or explore a concept, but it should not become the source of truth for a functional wheel mount, holes, fits, load paths, or safety-critical design.
For an engineering component, capture measurements with the appropriate tools, rebuild the important geometry in CAD, specify dimensions explicitly, and validate the physical part. Image3D is useful before that step when a visual first pass helps frame the work; it is not a replacement for constrained CAD, STEP/Parasolid solids, tolerance analysis, or functional testing.
Frequently asked questions
Did this character print without any repair?
No. Bambu Studio found mesh holes and applied an automatic repair before slicing. The mouth and teeth also required support planning and cleanup. This is a workable workflow, not a one-click print-ready result.
What did this case prove?
It shows that one customer could turn an original 2D character into a useful Image3D starting model, inspect and repair the STL in Bambu Studio, and complete a physical display print on a Bambu Lab P1S.
When should I repair rather than regenerate?
Repair a local defect when the large silhouette and major geometry are already worth keeping. Regenerate when the overall form, missing sections, or intended proportions are wrong.
Can this workflow make a functional engineering part?
No. Use AI output as a visual reference or creative first pass only. Functional parts need measurements, CAD reconstruction, fit checks, strength decisions, and physical validation.
Does a successful slice mean a model is physically print tested?
No. A successful slice is a slicer-check milestone. Physical-print evidence is separate, and it still does not generalize to another model, printer, material, or size.